On Facebook

Wednesday, May 18, 2016

Here's a video of me teaching from a little while back.


If you're interested in taking lessons with me, please visit:

Guitar Lessons In Boston
Guitar Lessons Via Skype

Saturday, March 5, 2016

Making An Exercise To Learn New Chords

One of the things I try to teach my students is how to develop their own exercises. Basically this involves deciding what you want to learn or get better at and finding the most efficient possible way to practice the material. It's important to understand that effective practicing is NOT the same thing as playing music. Effective practicing is goal oriented and consequently a very left brain activity. Playing music is usually fun or expressive, maybe even both. That's right brain territory.

The following example is something one might come up with to help learn new chord voicings. One of the most important things to keep in mind when creating an exercise is to think of a situation that you'll encounter several variations on in a lot of songs. You need a framework to put the exercise into. This framework is sort of like a container. If it has a funny shape or size (look at your guitar case), it may work well for a specific application, but it won't have much general use. If it's a fairly standard size and shape (think of your backpack), you'll be able to put a ton of stuff in it. Your exercises should be like your backpack. They should have a wide range of uses.

For these new chords, a blues progression is a great place to start!

In this particular case, I've further simplified the progression to simply cycle through I7, IV7, and V7 over and over again. This enables you to cover a lot more ground in a short period of time. The more efficiently you use your practice time the better. Efficiency not only means you get better at playing the guitar faster, but you also end up with more time to play music or eat cheeseburgers or whatever else you want to be doing!

The chords I've chosen are the 4 different inversions of a dominant 7 chord using a drop 2 voicing type. Don't worry if you don't know what that means. They're cool chords. Trust me. Just try playing through the exercise and keep your ears open. You'll probably find that you like the sound of some voicings better than others. Remember which ones those are. They're the ones that will add the most to the fun and expressive parts of playing music.


This is what might be called a voice-leading exercise. The chords connect to each other in a logical way using as little movement as possible from one pitch to the next. Again, the idea of economy is prevalent. I usually tell my students that playing a perfectly voice-lead progression like this will most likely result in getting fired from a band or a gig (logical is often not musical), but it's a great way to learn new fingerings and to really understand how the different chords want to behave in a given context.

To get the most out of the exercise and your practice time, you should definitely memorize it, play it in all 12 keys, and get comfortable starting from any chord. Be as thorough as possible. Think of variations that might be useful.

In application, try taking one little chunk of the exercise and use those voicings through a chorus of a 12-bar blues. Play the chords with a fun groove. Try different things with your right hand - arpeggiating, strumming, slapping the strings... Whatever comes to mind. Try skipping around through the exercise by playing two or three chords in a row and then jumping forward or backward to a different voicing. You can slide up into a chord from 1/2-step below or use the whammy bar to make the chord dip and dive all over the place. Suddenly this little exercise becomes music AND you've learned a pile of new chord voicings!

Boston Guitar Lessons
Skype Guitar Teacher

Wednesday, July 9, 2014

assembling modes

One of the cool things about teaching music is that I'm often put in a situation where I have to reorganize my thinking about something. Maybe the way I see a particular concept doesn't work very well for a student and I have to find a new way to present the material to them. The following is the result of one such occasion.

I have a student who'd been struggling for a while with understanding how to really work with modes. It's one thing to understand the fingerings, but it's a different matter entirely when you start trying to use them musically with other structures. He had a really solid grasp on pentatonic scales and major scales and we'd spent a lot of time working on arpeggios. He also understood what the modes are all about. The material was all working just great inside his noggin, but these different ideas wanted to stay different ideas, especially when it came to modes and applying them to playing over a blues.

What we came up with was a sort of flow chart that illustrates the development from the simple idea of octaves through pentatonic scales and arpeggios to the mode. In this example, I chose to use mixolydian.


To analyze these charts, we start with R. From that, we generate two more complex patterns - an arpeggio (R 3 5 b7) and a major pentatonic scale (R 2 3 5 6). We then put these two shapes together into a kind of hybrid (R 2 3 5 6 b7). At this point, there's only one note missing to make the full mode! We add the 4th, and we've got a full mixolydian scale.

This approach will work for any of the natural modes except for locrian since it has a b5 and the pentatonic scale won't really work in that context. It'll even work for a bunch of synthetic modes like lydian dominant!

Brant Grieshaber - guitarist
Guitar Teacher
Skype Guitar Lessons

Wednesday, May 14, 2014

2nd edition of my ebook is available!

Although I haven't been active with the blog for a while, I have released a second edition of my book, The Ultimate Guitarists Survival Guide:


The purpose of this book is not just to teach you a bunch of scales, arpeggios, and chords. This book teaches you how to really use them and it includes numerous exercises to help you really master the material. There are also chapters on technique, chord substitutions (which can also be applied to arpeggios!), and etudes.

Friday, October 12, 2012

simple finger style exercises

As I'm recovering from an injured left arm that's left me able to practice only for short periods of time, I've come up with some fairly simple exercises I can do on just open strings. Hey, if I can squeeze in another 5 minutes every time I pick up the guitar, all the better!

Except where indicated, use free-strokes for everything. Don't worry about playing them fast; just play them clean. Feel free to repeat any part of any exercise as many times as you'd like or to play them with chords.

(click on the images to enlarge)

1 - Rest-Stroke vs. Free-Stroke


2 - Arpeggiating
(This can also be done using all 4 fingers. I was just too lazy to write it out.)

 3 - Tremolo

 4 - Tremolo With The Thumb

As usual, feel free to play around with different variations and make the exercises your own and have fun!

Brant Grieshaber - guitarist
Guitar Teacher

Wednesday, May 16, 2012

Mistakes

When you make a mistake, you're learning. When you find the courage to continue making mistakes, you're on the path. When you accept the path as it is, it doesn't matter how many mistakes you make. There is joy in every single one.

Brant Grieshaber - guitarist
Guitar Teacher

Saturday, March 31, 2012

My book

Alright, it's time for a little more shameless self-promotion. I probably don't do enough of it anyway! For those of you who really want to milk your scale, arpeggio, and chord practice for all you can get out of it, my book is available digitally. You can get it for any reader. Here's the link for Kindle:

Ultimate Guitarists Survival Guide

Sunday, March 25, 2012

Pentatonic Etude For Blues - Playing The Changes

And here's a short video that will help you with the idea of changing scales when chords change.


Brant Grieshaber - guitarist
Guitar Teacher

Melodic Embellishment of Chords

Here's a short instructional video showing how you can add melodic embellishment to a 12-bar blues by making some simple alterations to a couple of standard chord voicings.


Brant Grieshaber - guitarist
Guitar Teacher

Thursday, February 9, 2012

short video lessons

After, oh, 3 years or so of procrastination, I'm preparing to do a series of short (<5min) free video lessons.

What sorts of topics would you like to see covered? Please be as specific as possible.

Brant Grieshaber - guitarist
Guitar Teacher

Saturday, February 4, 2012

new videos

I've posted 4 new videos on YouTube. One is an arrangement of the Brahms Lullaby and the other three are Piezas Sin Titulo 1-3 by Leo Brouwer.


diagonal thinking

Today I attended a clinic given by a fellow Berklee grad, German Schauss, who's a remarkable shred guitar player. Aside from his general sincerity as a human being, I was particularly intrigued by his Diagonal Thinking on the guitar. German has chops that most of us dream about. His picking has a precision and speed that can make 99% of guitar players weep. But that all comes down to practice time and discipline, which is nothing new to me. To play better, I spend more time practicing. Simple.

But the kind of mind-blowing speed that German displays with ease, even when he's playing at temperatures that are 40 degrees below what he's accustomed to, is inspired by his thinking about the instrument as well as his dedication to practice.

He thinks diagonally a great deal of the time. What do I mean? Here are some simple illustrations.


At first we have octaves. In the second variation, we add the notes of a G major triad. The fingering is identical through each octave, which is a crucial part of this way of viewing the fingerboard. In the third line, we add a passing tone (the 2nd) to our G major triad. The fourth line is a slightly more intricate pattern that adheres to this this perspective.

This is an amazingly economical way of viewing the fingerboard and economy is the seed of speed!

Brant Grieshaber - guitarist
Guitar Teacher

Monday, November 28, 2011

Mastery, Mindfulness, and the 10th Millennium

As I've spent this morning and afternoon practicing Brouwer pieces, interval seeds, and jazz standards while massively sleep deprived, I'm reminded yet again of one of the crucial components of really getting the guitar to do what I want it to do. Mindfulness. Focus. Attention.

Popular authors, such as Malcom Gladwell and Daniel Levetin to name a couple, have made a rather big deal out of this 10,000 hours of practice stuff. While it's nice to have to some contemporary research that tells us we really DO have to put in 10k hours of practice to master an instrument (or most any other activity), it's been all over Chinese folklore and Taoism in various forms for, well, over a couple thousand years.

If 10,000 hours sounds like a lot, you're right! It's no coincidence that the number 10,000 is also used to symbolize infinity or eternity in that literature. And trying to get to that number will feel like an eternity sometimes. But even that isn't enough...

I've often felt that just putting in that 10k hours is insufficient. There has to be something else to make it work. It needs to be done mindfully. Practicing must become a meditation and, as the 10 thousandth hour approaches, it becomes an effortless meditation.

There's an interesting bit of research a student of mine recently shared with me which supports this:

If You're Busy, You're Doing Something Wrong

If you don't want to read the whole thing, here's a summary. Really Good violinists and EXCEPTIONAL violinists in this study were found to practice the SAME amount of time on average. Yeah. That's right. There were a couple of differences in HOW they practice, though. The truly exceptional musicians concentrated their practicing into two big chunks every day instead of a little here, a little there, and a bit more after dinner. They also focused their attention on repetition and refinement.

Mindfulness. They weren't distracted and that focus allowed them to do something over and over again to make it better.

Here are a couple of quotes from Pablo Casals on practicing:

"I always practiced as if I had forever."

An interviewer once posed this question:

“Mr Casals, you’re the greatest cellist of the 20th Century, perhaps of all-time, and your career has been nothing short of spectacular. Why, at the age of 95, do you still practice 6 hours a day?"

Casals answered, “Because I think I’m making progress.”

-------

OK, OK. You get the point. But a LOT of people have difficulty focusing on what they're doing for 10 minutes, let alone a couple of hours at a time. Not everyone is going to take up meditation or some other practice to help sharpen this skill, but there are some simple and very practical things you can do while practicing to help.

1 - Turn OFF the ringer on your cell phone.

2 - DON'T check email or facebook while you're practicing.

If you have trouble with either of these, turn your phone and your computer off entirely. Practice in a different room, if need be.

3 - If you have roommates or housemates, let them know that you are not to be disturbed while you're practicing.

4 - When your mind wanders, just reel it back in. If the brain LOVES to do one thing, it's zipping from one crazy idea to another at light speed. "A, C#, F#, apple pie! F, E, bathtub! G..." With practice, you can train it to slow down and, eventually, stay with you and your guitar for longer periods of time. "A, C#, F#, F, E, ice cream!, G..." Improvement!


Brant Grieshaber - guitarist
Guitar Teacher

Monday, October 17, 2011

why bother? Part 2

One of the questions I posed was this: What are the components of melody? There's a simple answer to this, at least mechanically. Note that I'm not asking what the components of a GOOD melody might be.

1 - Notes
2 - Rhythm
3 - Articulation

Thinking about this isn't so much of an answer to "Why bother playing scales?" It's more an answer to "Why do I feel like playing scales doesn't help my improvisation?"

How is it an answer? Simple. Think about how you practice scales. If you're like most people, you play up and down in constant eighth notes or sixteenths, maybe practice some intervals or simple patterns, and that's really about it. Forget the fact that you're just practicing notes sequentially; you're just practicing notes, period!

Rhythm is simple to define. It's the spatial (chronological) relationship of different notes. So try playing your scales with some different rhythms!

Articulation is more complex. Basically stated, it's how a note is played. It could include things like dynamics, timbre, how it's attacked (harmonics, ligado, etc) what you do with it afterwards (bending, sliding...). So try playing around with some different articulations when you practice your scales.

Bottom line - You will play what you practice, so try to keep your practicing Interesting!

Brant Grieshaber - guitarist
Guitar Teacher

Tuesday, October 11, 2011

scales - why bother?

This post is inspired by a new student of mine. He's facing a dilemma that many people face in practicing. The bottom line is that he's not sure why he's practicing scales. What's the REAL benefit? To summarize an email from him, every teacher he's studied with has scale practice as part of the curriculum for learning to improvise, but he doesn't feel like he's getting better at it.


I can be a bit of a wise-ass teacher. I like to ask questions instead of giving answers whenever I can get away with it. I find that people learn more when they find their own answers. I'm mostly here to guide them in that search and point out some new places to look. Here's what I asked him:


-----

How often do you find yourself playing over non-diatonic changes, including things like secondary dominants?
How many different ways have you practiced a given scale? (C major in V position for example.)
How comfortable are you with key changes?
How often do key changes come up in the tunes you play?
What would say the components of a melodic idea really are?
What makes a solo a good one and what makes a solo suck?
What do you think theory is useful for?

-----

What are your answers to these questions? Feel free to comment away. I'll provide my own thoughts and my reflections on any comments in future posts.

Tuesday, August 23, 2011

Saturday, August 6, 2011

Monday, July 25, 2011

Impressions Of Brouwer, Vol. 2 kickstarter campaign

This is an exciting moment! The kickstarter campaign for the second CD of  Leo Brouwer's music is live. This is going to be a fusion arrangement of 8 of the Etudes. Please check it out!

http://www.kickstarter.com/projects/rbrantg/impressions-of-brouwer-vol-2-electric-etudes

Friday, July 22, 2011

the Hendrix chord exploded

The Hendrix chord, a 7(#9), is a favorite among musicians of any style. You can find it littering blues tunes, coloring rock tunes, flavoring jazz passages, and abusing modern classical music. The dissonance between the #9 and the major 3rd is sassy, brutally honest, and brimming with attitude. The conflict between major and minor tonality can't get much more clear cut. No wonder it ended up being nicknamed the Hendrix chord.

Most of us learn one way to play it:


This is a good way to play it. I have no bone to pick with it at all and I use this voicing often. I'm also a big fan of substitution when it comes to chords and arpeggios and my desire is generally to keep things conceptually simple while exploring different applications.

There's this goofy little chord that most people don't give much thought to. It's the diminished major 7 chord. R b3 b5 7. Kind of a creepy sounding bugger on its own. Guess why... It's moonlighting as a 7(#9) chord.

Here's how it works out. Let's say we're in E. Here are an E7(#9) chord and a G#°maj7 chord:

E7(#9): E, G#, B, D, Fx (yup, that's F double sharp, or G if you prefer.)
G#°maj7: G#, B, D, Fx

Hmmm... Notice anything similar about these two? If I ignore the E in the Hendrix chord, I have a G#°maj7 note for note. Ahhh, the beauty of chord substitution.

There's an introduction to the mechanics. Here are some new voicings to play with.


And on the top set of strings:


Some of  these are pretty rough on the fingers. The stretches are unusual, but doable. I suggest singing through every one of them to really internalize the sound of each inversion.

Thursday, June 2, 2011

recording the Brouwer Etudes Part II: mixing

Note: all images can be enlarged by clicking on them.

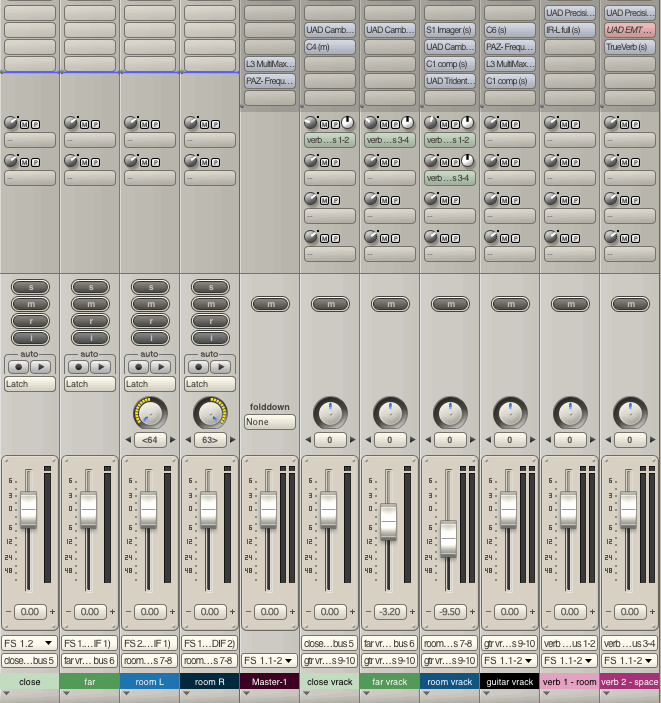
In this second post, I'm going to walk you more or less through the process of mixing the Etudes. I recorded each piece as a "chunk" in Digital Performer. To simplify the mixing process, I created v-racks and routed each of the tracks through an auxiliary channel. I also setup aux channels for two different reverbs, one for handling the mix of all the different sources, and a master track. All of these aux tracks were in one v-rack. Here's a screen shot of the mix window:


My goal was to simulate different perspectives on the guitar - One right up front, another further back, and a third from rather far away. By blending these different perspectives, we get something that's closer to what the ear actually interprets than if we depend on only one.

For the room mics, I'd originally labeled and panned them from the perspective of the performer. I decided to mix from the perspective of a listener, so I had to switch the L and R channels for the room mics. Rather than go through 29 different chunks and re-pan everything, I used the Waves S1 Imager to switch L & R. I also decided to close the stereo field up by about 25 or 30%. I prefer, when recording, to get as wide a spread as possible. It's always easier to close it up (bring the channels closer to center) than to artificially widen it.

The next thing was to EQ out the frequencies I didn't want. For the most part, this just meant rolling off some of the sub frequencies (mostly below 100Hz), but I did pull out just a bit around 5k on the room mics. For this, I favor the UA emulation of the Cambridge EQ:


The close mic still had more of these really low frequencies than I wanted. You wouldn't even hear them without a subwoofer, but they're obnoxious at certain volumes with one. Of course, they also lend to the warmth of the sound, so I didn't want to just cut them even further across the board. I decided to use a multiband compressor to reduce the very low frequencies at higher volumes. For frequency dependent compression, the Waves C4 and C6 are hard to beat. I used this on the close mic and again on the aux for the mix of all mics. If you're familiar with the interface for this compressor, you'll notice that the compressor only triggers when the level at those frequencies is fairly high, but that the gain reduction when it does trigger is significant. Here's the C6:


The room mics received a little compression via the Waves C1 and just a tiny bit of post compression EQ. This was the ONLY EQing that was done aside from the initial surgical EQ applied to each track. The EQ boosted some mids and lows and rolled off the really high frequencies to simulate the sound of being even further away from the guitar than the mics really were. For this, I ended up using the UA emulation of the Trident A-Range:


The slight compression was applied to the room mics because dynamics tend to have less of a range from further away and this helped to reproduce that.

The next step was to apply some reverb to all of the tracks. I used a fairly short and warm reverb to do this using the Waves IR-L since the room I record in is (intentionally) almost entirely dry. If you look at the screen shot of the mix window, you can see that very little is applied to the close mic, a little more to the far mic, and even more to the room mics. This helps to create a sense of depth in the mix.

I also applied a bit of a longer reverb to the room mics using Waves TrueVerb. You can see that I first experimented with the UA EMT140 and decided against it. Again, the idea here is that a listener much further away from the performer will hear more room ambience than a listener right up close. I wanted the room mics to sound much further away than my physical space would allow and the extra reverb helps create that effect.

On both reverbs, I used a bit of compression to the signal going in. This is because most digital reverbs (including convolution reverbs like the IR-L) tend to really jump out in the high frequencies at higher volumes and be more subdued at quieter volumes. Real rooms aren't nearly as dramatic at the high end, so a compressor that could filter out (not respond to) lower frequencies was useful. The UA Precision Bus Compressor was just the tool for the job. I just used it to trim 1-2 dB off when the guitar got louder:


The last step in mixing was to try and "glue" these three different sources together. The first thing to do was balance the levels of the three sources. Since I wanted a fairly up close and intimate sound, I used more of the close mic, less of the far mic, and even less of the room mics. I then applied the C6 to tame the really low frequencies of the composite sound from all three sources. (See screen shot above.)

I would have then typically run everything through the UA LA-2A - a leveling amplifier that really does a brilliant job of pulling different sources together and which I use religiously on drums - and done some post EQ. I found, however, that the occasional fortissimo rasgueado (right hand strumming really loud) blew the meters on everything and needed to be brought under control if I wanted to have a decent over-all level and consistent sound across all 30 etudes.

For that, I used the Waves L3 Multi-Maximizer, a multi-band limiter, which I generally only use as a mastering tool. In this case, it was exactly what I needed to reduce the signal on those very occasional really loud parts without affecting everything else.

I found two interesting things after that. The first was that I didn't like what the LA-2A did to the mix! It's uncommon that that happens, but it did. I opted for using the C1 again instead. A barebones compressor with no "color" was, in fact, all this needed for finally blending my close, far, and room mics together. The second thing was that any little tweaks I tried to make with various EQs took away from the sound rather than adding to it, so I left the mix without any further adjustments.

Oddly, EQ was hardly a factor in creating these recordings. Most of it was finding different ways of using compression (which is often avoided in classical recordings) and using different mic "perspectives" to create the illusion of what the human ear interprets.

If there's one thing to keep in mind with the use of most effects, it's that less is more. You'll often get better results from dialing back a particular effect and applying it again at a later stage in the process if necessary than you will by simply dialing it up in the first place.

Take notice of the number of times that compression of some kind is applied, but just a bit. Not more than 1 or 2 dB. There are two different reverbs in use and each is used differently on each source. I used EQ to roll off some of the sub frequencies, but I didn't cut them out when that wasn't enough. I moved to a frequency specific compressor after that and ended up using that idea subtly twice rather than dramatically once.

Here are some effected recordings for you to listen to. Compare these to the dry ones in my previous post. Consider how the three sources relate to one another and help build an amalgam illusion of a real guitar hitting your ears instead of a recorded guitar.

close wet
far wet
room wet

And the end result:
mix

Brant Grieshaber - guitarist
Guitar Teacher